Table of Contents
Real-Time Window Capture Plugin for Unreal Engine Display external application windows directly within your Unreal Engine project.
You can download the free Tester app from this page to check the operation of this plugin.
Overview
WindowCapture2D captures the windows of external applications in real time and displays them as textures in Unreal Engine.
With this plugin, you can seamlessly integrate desktop applications, web browsers, and other software as in-game textures.
You can display other applications within VR or AR applications, show additional content inside simulations, and add innovative features to your UE projects.
Key Features
- Real-time capture of any window on Windows OS (Mac and Linux are not supported)
- Desktop-level capture by selecting a specific monitor (available in v2.1.0 and later)
- Cropping any region from the captured image (available in v2.1.0 and later)
- Display captured windows as textures in Unreal Engine
- Flexible target selection by window title (supports exact match, partial match, and customizable rules)
- High-performance capture system
- Full feature support for both C++ and Blueprint
Supported Unreal Engine Versions
Unreal Engine compatibility for each WindowCapture2D version is listed below.
| Plugin Version | Supported UE Versions |
|---|---|
| v2.1.0 | UE5.5 - 5.8 |
Demo video
The following video introduces the basic features and usage of WindowCapture2D:
Usage Examples
Typical use cases for WindowCapture2D:
- Displaying real software interfaces in simulators or training applications
- Implementing in-game browsers
- Creating virtual desktop environments
- Developing interactive multimedia exhibits
How to use
Output the captured image onto a plane in 3D space
After opening the Settings menu in the Content Browser and checking “Show Plugin Content,” you will be able to select “WindowCapture2D Content” from the tree view on the left side of the screen. Please select “PlaneActor.”

Select the WindowCapturePlane Actor and place it in your level.
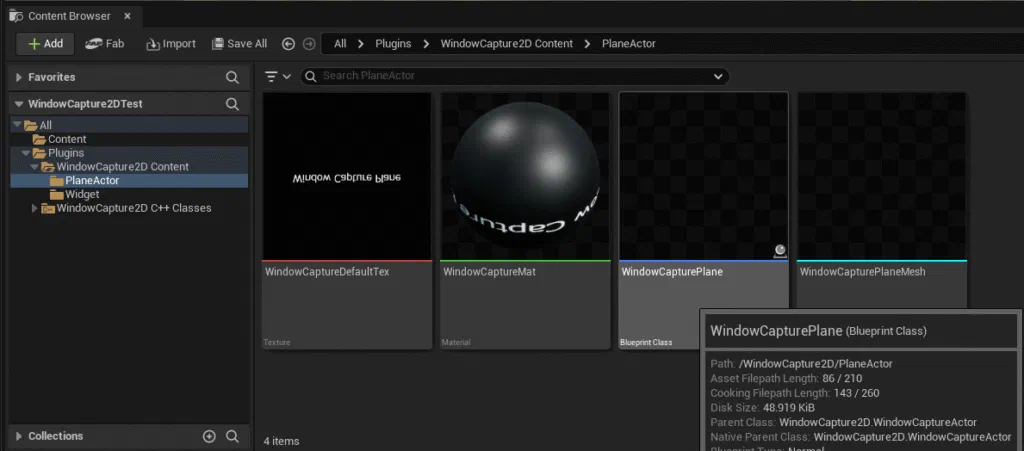
How to capture a window
Set the target window to capture in the Properties of the placed WindowCapturePlane.
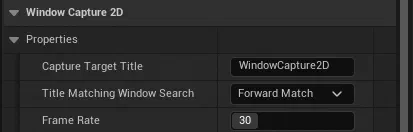
Enter the title of the window you want to capture in “Capture Target Title.”
In “Title Matching Window Search,” you can select how the entered string is matched with window titles:
- PerfectMatch: Exact match with the window title
- ForwardMatch: The window title starts with the entered string
- PartialMatch: The window title contains the entered string
- BackwardMatch: The window title ends with the entered string
- RegularExpression: Match the window title using a regular expression
Set the capture interval in “Frame Rate.”
When you press Play, the captured image will be displayed on the WindowCapturePlane.
How to capture the desktop
If you want to capture the desktop instead of a window, configure the following:
- Set
CaptureTargetTypetoDesktop - Enter the monitor index you want to capture in
MonitorIndex(starting from 0)
How to trim the captured image
If you want to use only a specific region of the captured image, configure the following:
- Enable
bUseTrimming - Set the area you want to crop using
TrimX,TrimY,TrimWidth, andTrimHeight
Output the captured image to a widget
Open the Blueprint of your user widget and place WindowCaptureUMG anywhere you like.
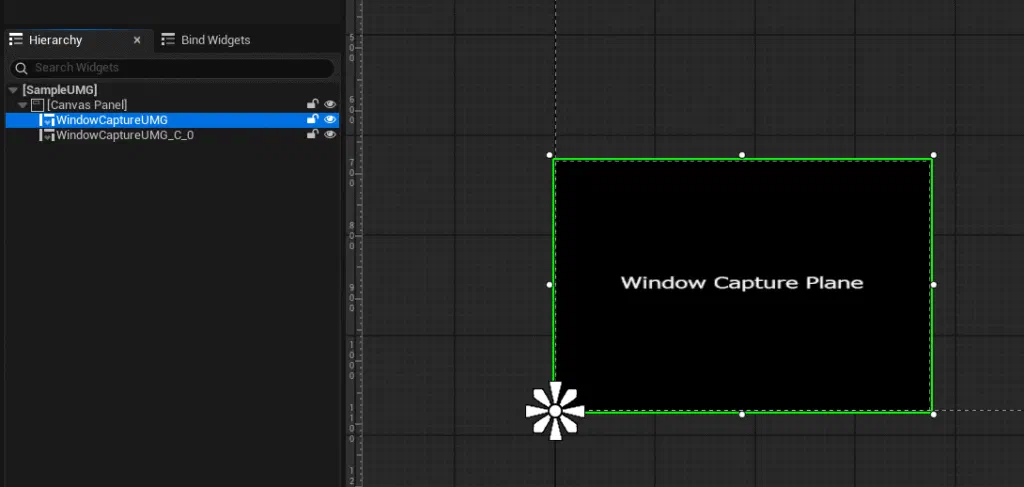
Set the target window to capture in the Properties of the placed WindowCaptureUMG.
The items to be set are the same as those for WindowCapturePlane mentioned above.
Directly handle the texture where the captured image is output.
You can obtain the texture containing the captured image by referring to the following blueprint.
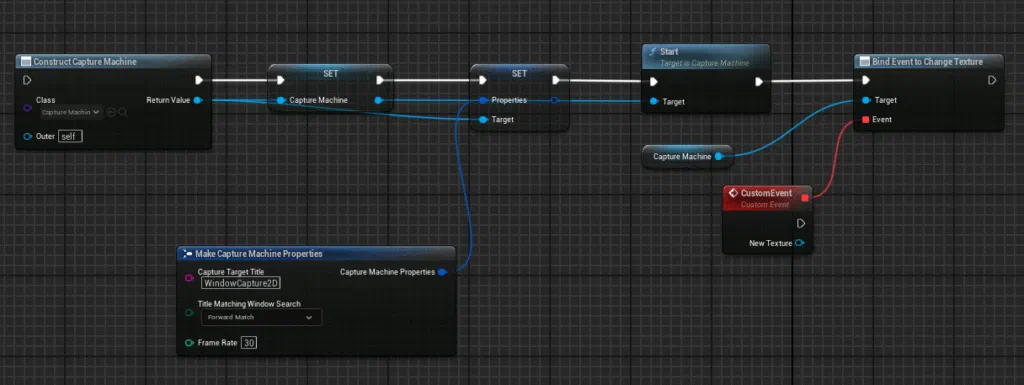
Create a CaptureMachine object.
Set the window information in the Properties of the CaptureMachine object.
Call the Start method of the CaptureMachine object.
When the window is captured, the “Change Texture” event is triggered, where you can obtain the Texture2D object.
Note
If you change the size of the window being captured, a new texture will be created each time, and the “Change Texture” event will be called.
Notes / Points to be aware of
- WindowCapture2D works only on Windows OS.
- Although it should theoretically work on Windows 10, official support is provided only for Windows 11.
- Capturing maximized windows on high-resolution displays such as 4K or 5K will consume significant CPU and GPU resources.
- Even on Windows 11, there are some windows that cannot be captured.
FAQ
You can check frequently asked questions here.
Please Leave a Review
Thank you for using this plugin! Your review on the Epic Games Fab store is a great encouragement for future development. We'd love to hear your feedback!
Write a Review on Fab